Tutorial creating & using Hirens Boot CD & MemTest86 diagnostic stress testing tools for USB boot to Windows 10 PE & WinXPmini on BIOS & UEFI
(As always, please improve so that all benefit from every action you take.)
Thanks to Mike Easter for suggesting Hiram BootCD USB diagnostic tools.
o What hardware diagnostic stress-testing freeware can you recommend? <https://groups.google.com/forum/#!topic/alt.comp.freeware/dkkdOmL95d8>
End result:
a. A 2GB USB stick can boot with BIOS/UEFI to Win10PE for diagnostics
b. A 2GB USB stick can boot with BIOS to WinXPMini for hardware diagnostics
1. Find an empty USB flash drive of at least 2GB size:
o Hirens BootCD Win10PE used about 1.25 GB of my 1.90 GB flash stick. <https://i.postimg.cc/HsGPFQSZ/hiren02.jpg>
o Hirens BootCD 15.2 used about 0.58 GB of my 1.90 GB flash stick. <https://i.postimg.cc/50BSJCK9/hiren07.jpg>
2. Determine whether your PC is BIOS or UEFI (mine is BIOS).
Win+R > %comspec% /k findstr Callback_BootEnvironmentDetect %SystemRoot%\Panther\setupact.log
o %SystemRoot%\Panther\setupact.log
- Callback_BootEnvironmentDetect: Detected boot environment: BIOS
- Callback_BootEnvironmentDetect: Detected boot environment: UEFI
Note: Mine reported BIOS
Win+R > msinfo32 > System Summary > BIOS Mode
- Win+R > msinfo32 > System Summary > BIOS Mode > Legacy
- Win+R > msinfo32 > System Summary > BIOS Mode > UEFI
Note: Legacy === BIOS
3. If needed, set your PC boot order so that it boots from the USB stick.
For me the defaults worked: i.e., at POST, F10==BIOS, ESC=BOOT, F9=DIAG Entering Setup > Boot > Boot Device Priority
1st Boot Device = [CD-ROM Group]
2nd Boot Device = [Floppy Group]
3rd Boot Device = [HDD Group]
4th Boot Device = [Network Boot Group]
Note: USB isn't mentioned in my BIOS; but USB booted fine nonetheless.
4. Download the Hiren's Boot CD software containing diagnostic tools: <http://www.hirensbootcd.org/download/>
a. UEFI/BIOS Win10PE:
Download either the Win10PE BIOS/UEFI HirensBootCD (HBCD) ISO file: <https://www.hirensbootcd.org/files/HBCD_PE_x64.iso> <https://www.hirensbootcd.org/files/HBCD_PE_x64.iso> <http://mirror.sfo12.us.leaseweb.net/hirensbootcd/HBCD_PE_x64.iso>
Name: HBCD_PE_x64.iso
Size: 1354811392 bytes (1292 MiB)
SHA256: D67BCF0437A1BD27F31655C4A9C81C93269A5A239D43F38D0375618443D372BC
b. BIOS WinXPmini:
Or download the BIOS-only WinXPmini HirensBootCD (HBCD) ISO file: <http://www.hirensbootcd.org/files/Hirens.BootCD.15.2.zip>
Name: Hiren's.BootCD.15.2.iso
Size: 603979776 bytes (576 MiB)
SHA256: 50384A61D304E06B720F9EF729C662D2E9EDA05A96E1C9056975C40E3BF3F2D0
Note: The tools on these two releases are both the same & different: <https://i.postimg.cc/qv5N2sWS/hiren15.jpg>
5. Download the Windows Rufus ISO-to-USB tool:
<https://rufus.ie/> <https://github.com/pbatard/rufus/releases/download/v3.11/rufus-3.11.exe> Name: rufus-3.11.exe
Size: 1155640 bytes (1128 KiB)
SHA256: A43BF34285D393F843B05D80F74C4790ED7F6AC636393CA5F6375AE0BB02E719
Note: The hash on the portable Rufus was the same as the non portable.
6. Remove all USB drives & insert the empty USB flash drive into the PC.
7. In Windows, right click on the Rufus executable to run as administrator.
NOTE: The specific settings for creating a BIOS Win10PE USB are not documented anywhere on the net I could find, so please take note: <https://i.postimg.cc/2ykDXjW6/hiren01.jpg>
a. UEFI Win10PE
To create a bootable USB stick for HBCD_PE_x64.iso on UEFI machines:
When you start Rufus as an admin, accept the Win10 UAC consent prompt.
This brings up the Rufus 3.11.1678 GUI
Set the options to:
- Device: (choose your empty USB stick drive letter and label)
(If you only have one USB stick plugged in, it will default to it.)
- Boot selection:
(Choices are: "Disk or ISO image", "FreeDOS", "Non bootable")
I left the Boot selection at "Disk or ISO image".
I pressed the [SELECT] button to choose the "HBCD_PE_x64.iso" file.
- Partition scheme: GPT (The only options are "GPT" and "MBR")
Target System: The only option is "UEFI (non CSM)"
Volume label: This defaulted to "HBCD_PE_x64"
File system: FAT32 (other choices are "NTFS" & "FAT")
Cluster size: It defaulted to 4096 bytes (but other options existed).
When the Status says "READY", press the "START" button.
A warning pops up saying all data on the USB drive will be destroyed.
Press [OK].
The messages will be:
- Deleting partitions (This may take a while)...
- Partitioning (GPT)...
- Formatting (FAT32)...
- Creating file system: Task 1/5 completed.
- Creating file system: Task 2/5 completed.
- Creating file system: Task 3/5 completed.
- Creating file system: Task 4/5 completed.
- Creating file system: Task 5/5 completed.
- Writing Master Boot Record
- Copying ISO files:
- Success
(Mine took six minutes to complete from start to finish.)
Note: You'll get this error if you create a UEFI USB but boot on BIOS: <https://i.postimg.cc/2ykDXjW6/hiren01.jpg>
ERROR: BIOS/LEGACY BOOT OF UEFI-ONLY MEDIA
Recreate the drive in RUFUS and use:
* Partition scheme -> MBR
* Target system -> BIOS
b. BIOS Win10PE
To create a bootable USB stick for HBCD_PE_x64.iso on BIOS machines:
* Partition scheme -> MBR
* Target system -> BIOS (it was the only option once MBR was set)
* File system -> NTFS (it was the only option once MBR was set)
(Mine took five minutes to complete from start to finish.)
c. BIOS WinXPmini
To create a bootable USB stick for HBCD 15.2 on BIOS machines:
Boot selection -> Hiren's.BootCD.15.2.iso
Partition scheme -> "MBR" (it's the only option)
Target system -> "BIOS (or UEFI-CSM)" (it's the only option)
Volume label -> HBCD 15.2 (it's the default)
File system -> "FAT32" (other options are "FAT" & "NTFS")
Cluster size -> "4096 bytes (Default)"
[START] (Mine took 30 minutes to complete from start to finish.)
8. Now you can boot using that USB image on BIOS/UEFI for Win10/WinXP!
Note: In my case, I press "ESC" during POST to get to the boot menu.
Win10PE: <https://i.postimg.cc/HsGPFQSZ/hiren02.jpg>
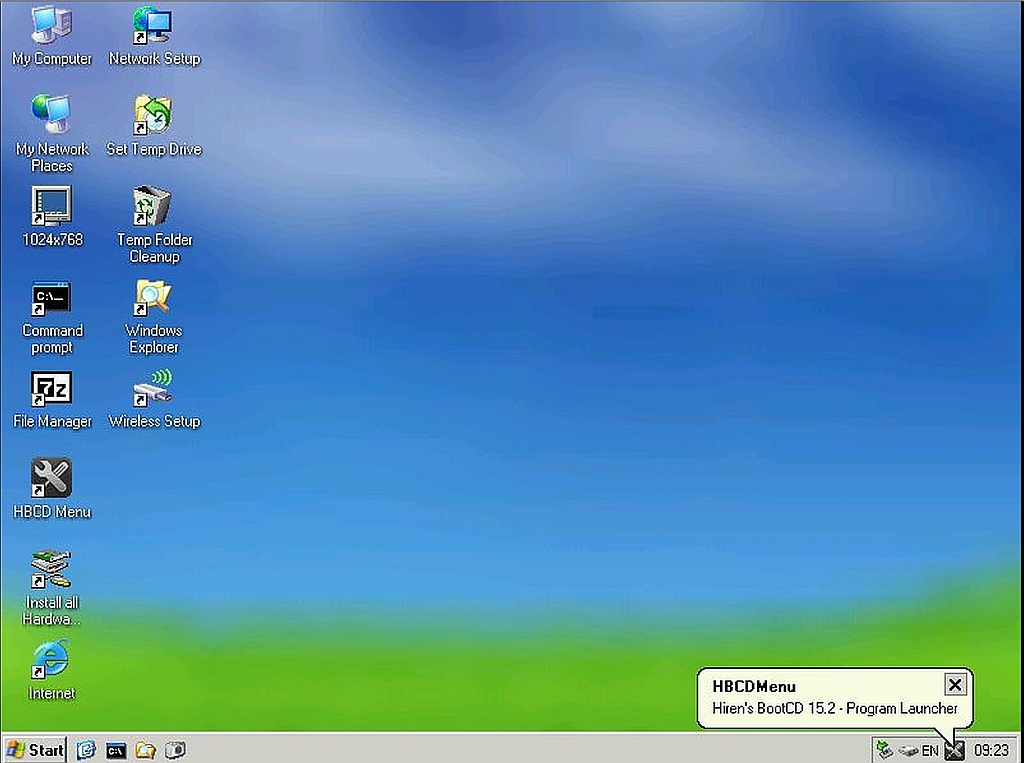
WinXPMini: <https://i.postimg.cc/50BSJCK9/hiren07.jpg>
Note: My boot to Windows10PE was _much_ faster than to WinXPmini.
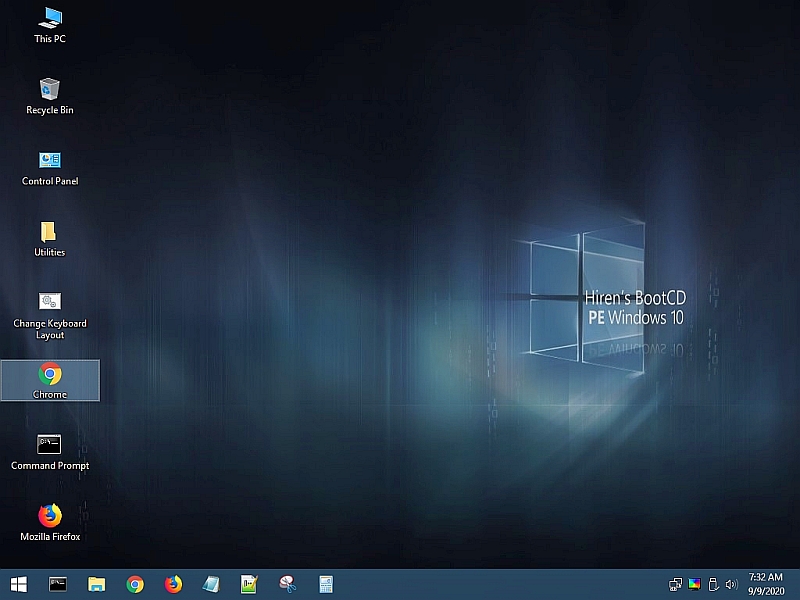
Win10PE looks just like "regular" Windows 10, kind of sort of: <https://i.postimg.cc/HsGPFQSZ/hiren02.jpg>
Win10PE had access to the old system also so I could save a screenshot: <https://i.postimg.cc/sDp0zvqV/hiren03.jpg>
9. Each boot environment has similar (but sometimes different) debug tools: <https://i.postimg.cc/qv5N2sWS/hiren15.jpg>
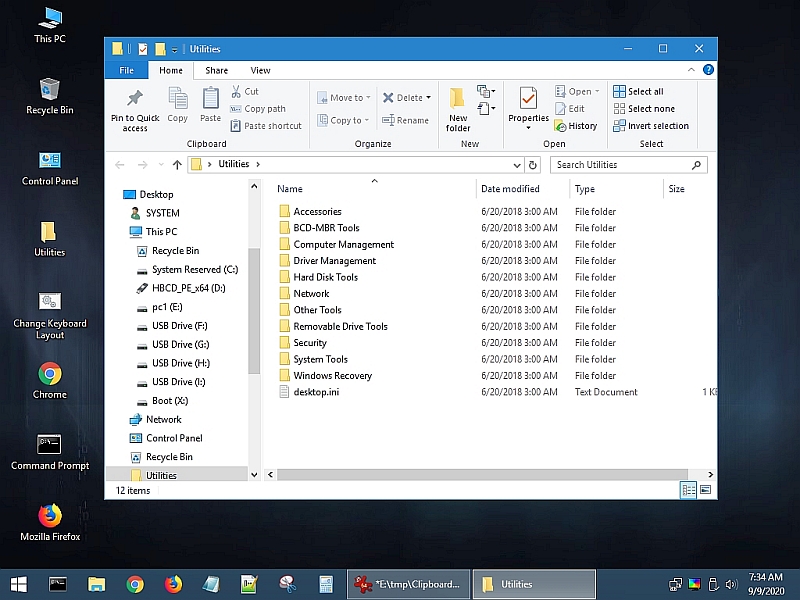
For example, on the Win10PE, these were the top level tools provided: <https://i.postimg.cc/W18WDxsC/hiren04.jpg>
o Accessories
o BCD-MBR Tools
o Computer Management
o Driver Management
o Hard Disk Tools
o Network
o Other Tools
o Removable Drive Tools
o Security
o System Tools
o Windows Recovery
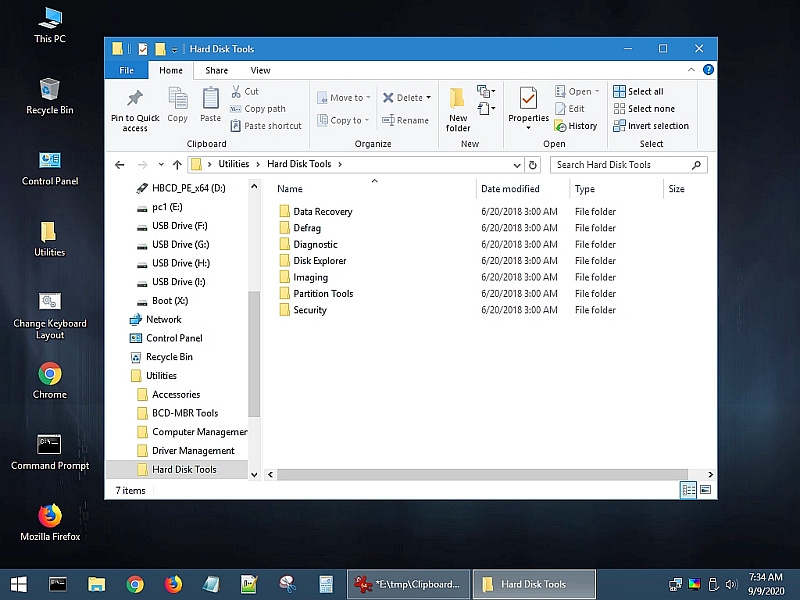
Here's what the Hiren PE had in the "Hard Disk Tools" directory: <https://i.postimg.cc/5ttP8p00/hiren05.jpg>
o Data Recovery
o Defrag
o Diagnostic
o Disk Explorer
o Imaging
o Partition Tools
o Security
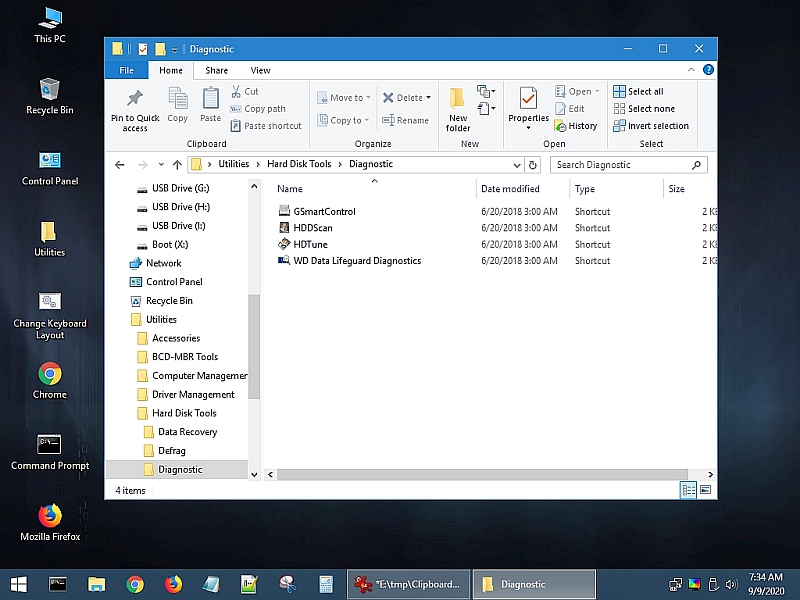
Here's what the PE had in the Hard Disk Tools "Diagnostic" category: <https://i.postimg.cc/CK6c7DB4/hiren06.jpg>
o GSmartControl
o HDDScan
o HDTune
o WD Data Lifeguard Diagnostics
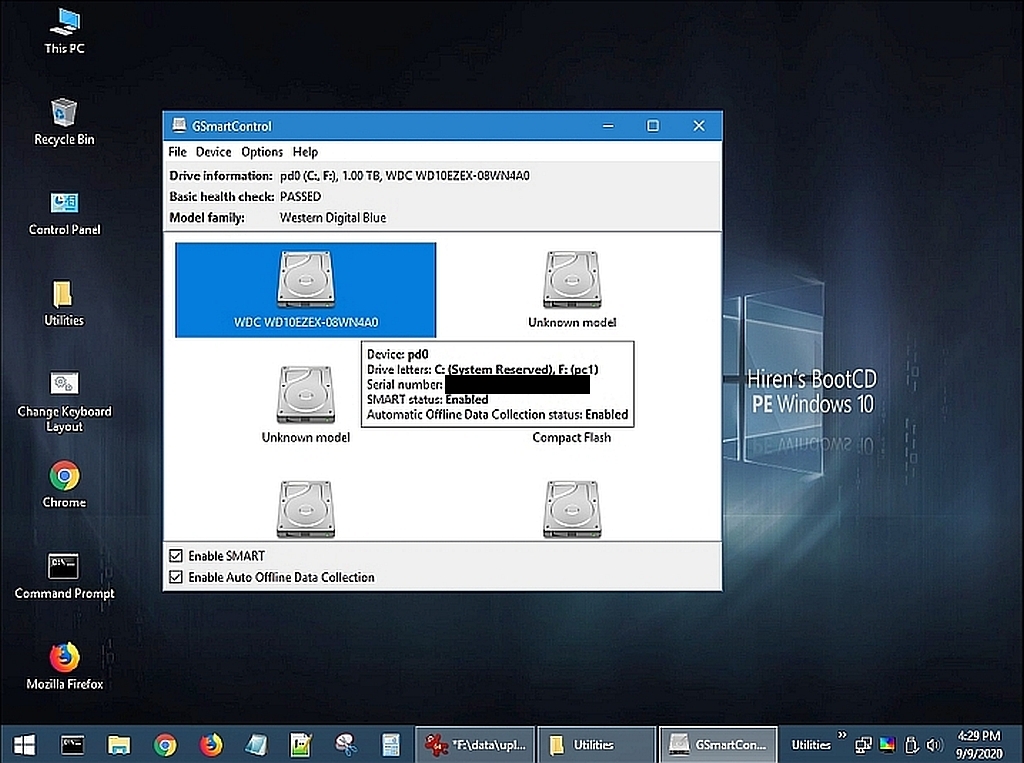
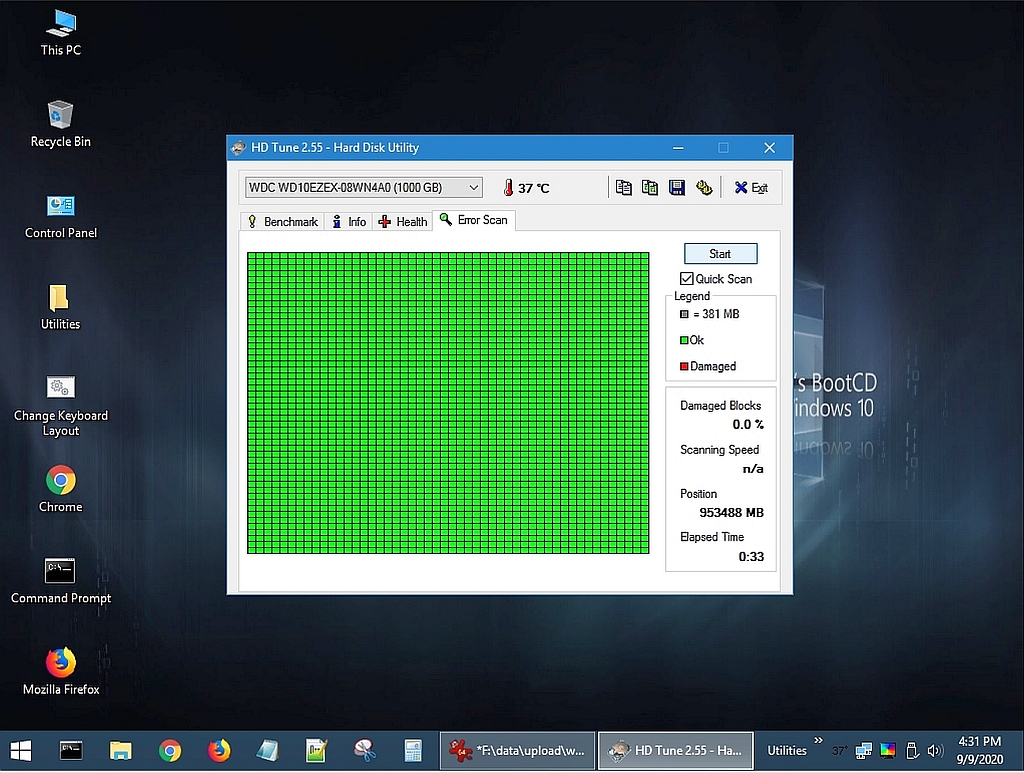
For example, here are screenshots of those HDD diagnostics on Win10PE: <https://i.postimg.cc/CK6c7DB4/hiren06.jpg>
o GSmartControl <https://i.postimg.cc/BbTFgj2D/hiren13.jpg>
o HDTune <https://i.postimg.cc/WpGqxJJq/hiren14.jpg>
o WD Data Lifeguard Diagnostics <https://i.postimg.cc/KzKrnc9r/hiren12.jpg>
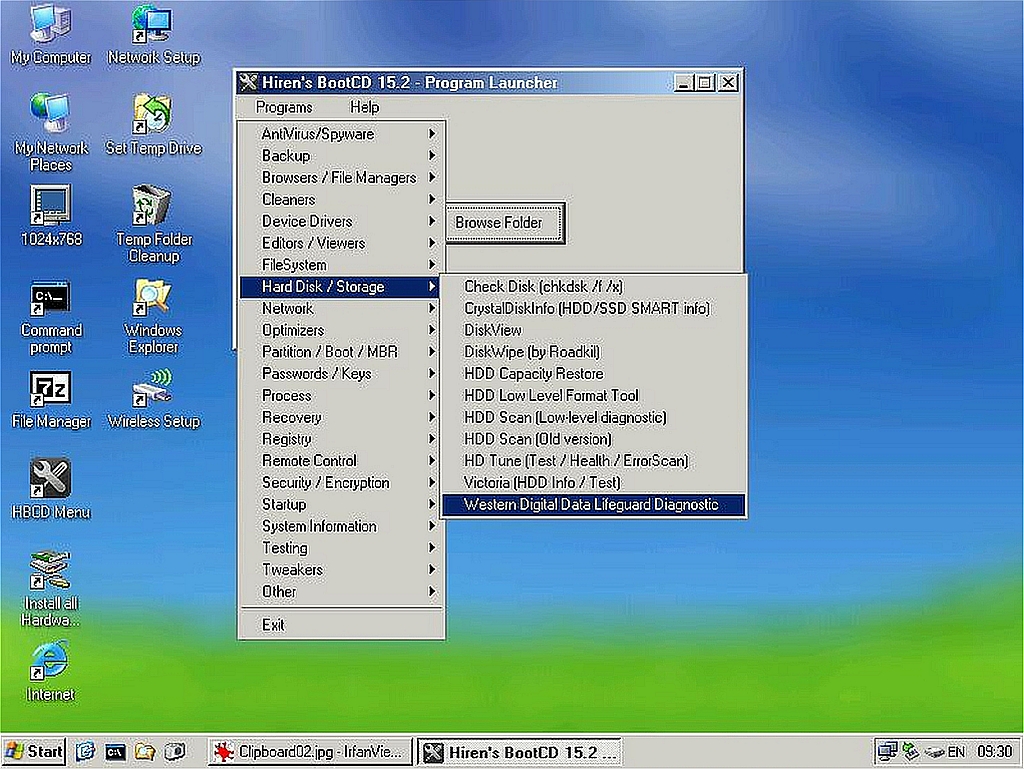
Here are HDD diagnostic utilities on WinXPmini (Hirens 15.2 Boot CD): <https://i.postimg.cc/7L7g1zk1/hiren09.jpg>
o Check Disk (chkdsk /f /x)
o CrystalDiskInfo (HDD/SSD SMART info)
o DiskView
o DiskWIpe (by Roadkill)
o HDD Capacity Restore
o HDD Low Level Format Tool
o HDD Scan (Low-level diagnostic)
o HDD Scan (Old version)
o HDD Tune (Test / Health / ErrorScan)
o Victoria (HDD Info / Test)
o Western Digital Data Lifeguard Diagnostic
o HDDScan
o HDTune
o WD Data Lifeguard Diagnostics
Note: While MemTest86 is on the Hirams Boot CD, you can boot it separately:
o UEFI MemTest86 v8
<https://www.memtest86.com/downloads/memtest86-usb.zip>
o BIOS MemTest86 v4 <https://www.memtest86.com/downloads/memtest86-4.3.7-usb.img.zip>
That MemTest86 utility came with an "ImageUSB.exe" utility from "Passmark.com" <http://www.passmark.com> which seems to do pretty
much whatever Rufus 3.11 did for the Hiren's Boot CD ISO
files to create a bootable USB stick.
See also:
o Windows 10 BSOD indicates a hardware problem - but what hardware is the problem?
<http://www.pcbanter.net/showthread.php?t=1110105> <https://alt.comp.os.windows-10.narkive.com/oL7PTNKu/windows-10-bsod-indicates-a-hardware-problem-but-what-hardware-is-the-problem>
--
As always, please test & improve so all may benefit from your every action.
- For more content and improvements you can also visit https://perfectessaywriting.com/
Tutorial creating & using Hirens Boot CD & MemTest86 diagnostic stress testing tools for USB boot to Windows 10 PE & WinXPmini on BIOS & UEFI
(As always, please improve so that all benefit from every action you take.)
Thanks to Mike Easter for suggesting Hiram BootCD USB diagnostic tools.
o What hardware diagnostic stress-testing freeware can you recommend? <https://groups.google.com/forum/#!topic/alt.comp.freeware/dkkdOmL95d8>
End result:
a. A 2GB USB stick can boot with BIOS/UEFI to Win10PE for diagnostics
b. A 2GB USB stick can boot with BIOS to WinXPMini for hardware diagnostics
1. Find an empty USB flash drive of at least 2GB size:
o Hirens BootCD Win10PE used about 1.25 GB of my 1.90 GB flash stick. <https://i.postimg.cc/HsGPFQSZ/hiren02.jpg>
o Hirens BootCD 15.2 used about 0.58 GB of my 1.90 GB flash stick. <https://i.postimg.cc/50BSJCK9/hiren07.jpg>
2. Determine whether your PC is BIOS or UEFI (mine is BIOS).
Win+R > %comspec% /k findstr Callback_BootEnvironmentDetect %SystemRoot%\Panther\setupact.log
o %SystemRoot%\Panther\setupact.log
- Callback_BootEnvironmentDetect: Detected boot environment: BIOS
- Callback_BootEnvironmentDetect: Detected boot environment: UEFI
Note: Mine reported BIOS
Win+R > msinfo32 > System Summary > BIOS Mode
- Win+R > msinfo32 > System Summary > BIOS Mode > Legacy
- Win+R > msinfo32 > System Summary > BIOS Mode > UEFI
Note: Legacy === BIOS
3. If needed, set your PC boot order so that it boots from the USB stick.
For me the defaults worked: i.e., at POST, F10==BIOS, ESC=BOOT, F9=DIAG Entering Setup > Boot > Boot Device Priority
1st Boot Device = [CD-ROM Group]
2nd Boot Device = [Floppy Group]
3rd Boot Device = [HDD Group]
4th Boot Device = [Network Boot Group]
Note: USB isn't mentioned in my BIOS; but USB booted fine nonetheless.
4. Download the Hiren's Boot CD software containing diagnostic tools: <http://www.hirensbootcd.org/download/>
a. UEFI/BIOS Win10PE:
Download either the Win10PE BIOS/UEFI HirensBootCD (HBCD) ISO file: <https://www.hirensbootcd.org/files/HBCD_PE_x64.iso> <https://www.hirensbootcd.org/files/HBCD_PE_x64.iso> <http://mirror.sfo12.us.leaseweb.net/hirensbootcd/HBCD_PE_x64.iso>
Name: HBCD_PE_x64.iso
Size: 1354811392 bytes (1292 MiB)
SHA256: D67BCF0437A1BD27F31655C4A9C81C93269A5A239D43F38D0375618443D372BC
b. BIOS WinXPmini:
Or download the BIOS-only WinXPmini HirensBootCD (HBCD) ISO file: <http://www.hirensbootcd.org/files/Hirens.BootCD.15.2.zip>
Name: Hiren's.BootCD.15.2.iso
Size: 603979776 bytes (576 MiB)
SHA256: 50384A61D304E06B720F9EF729C662D2E9EDA05A96E1C9056975C40E3BF3F2D0
Note: The tools on these two releases are both the same & different: <https://i.postimg.cc/qv5N2sWS/hiren15.jpg>
5. Download the Windows Rufus ISO-to-USB tool:
<https://rufus.ie/> <https://github.com/pbatard/rufus/releases/download/v3.11/rufus-3.11.exe> Name: rufus-3.11.exe
Size: 1155640 bytes (1128 KiB)
SHA256: A43BF34285D393F843B05D80F74C4790ED7F6AC636393CA5F6375AE0BB02E719
Note: The hash on the portable Rufus was the same as the non portable.
6. Remove all USB drives & insert the empty USB flash drive into the PC.
7. In Windows, right click on the Rufus executable to run as administrator.
NOTE: The specific settings for creating a BIOS Win10PE USB are not documented anywhere on the net I could find, so please take note: <https://i.postimg.cc/2ykDXjW6/hiren01.jpg>
a. UEFI Win10PE
To create a bootable USB stick for HBCD_PE_x64.iso on UEFI machines:
When you start Rufus as an admin, accept the Win10 UAC consent prompt.
This brings up the Rufus 3.11.1678 GUI
Set the options to:
- Device: (choose your empty USB stick drive letter and label)
(If you only have one USB stick plugged in, it will default to it.)
- Boot selection:
(Choices are: "Disk or ISO image", "FreeDOS", "Non bootable")
I left the Boot selection at "Disk or ISO image".
I pressed the [SELECT] button to choose the "HBCD_PE_x64.iso" file.
- Partition scheme: GPT (The only options are "GPT" and "MBR")
Target System: The only option is "UEFI (non CSM)"
Volume label: This defaulted to "HBCD_PE_x64"
File system: FAT32 (other choices are "NTFS" & "FAT")
Cluster size: It defaulted to 4096 bytes (but other options existed).
When the Status says "READY", press the "START" button.
A warning pops up saying all data on the USB drive will be destroyed.
Press [OK].
The messages will be:
- Deleting partitions (This may take a while)...
- Partitioning (GPT)...
- Formatting (FAT32)...
- Creating file system: Task 1/5 completed.
- Creating file system: Task 2/5 completed.
- Creating file system: Task 3/5 completed.
- Creating file system: Task 4/5 completed.
- Creating file system: Task 5/5 completed.
- Writing Master Boot Record
- Copying ISO files:
- Success
(Mine took six minutes to complete from start to finish.)
Note: You'll get this error if you create a UEFI USB but boot on BIOS: <https://i.postimg.cc/2ykDXjW6/hiren01.jpg>
ERROR: BIOS/LEGACY BOOT OF UEFI-ONLY MEDIA
Recreate the drive in RUFUS and use:
* Partition scheme -> MBR
* Target system -> BIOS
b. BIOS Win10PE
To create a bootable USB stick for HBCD_PE_x64.iso on BIOS machines:
* Partition scheme -> MBR
* Target system -> BIOS (it was the only option once MBR was set)
* File system -> NTFS (it was the only option once MBR was set)
(Mine took five minutes to complete from start to finish.)
c. BIOS WinXPmini
To create a bootable USB stick for HBCD 15.2 on BIOS machines:
Boot selection -> Hiren's.BootCD.15.2.iso
Partition scheme -> "MBR" (it's the only option)
Target system -> "BIOS (or UEFI-CSM)" (it's the only option)
Volume label -> HBCD 15.2 (it's the default)
File system -> "FAT32" (other options are "FAT" & "NTFS")
Cluster size -> "4096 bytes (Default)"
[START] (Mine took 30 minutes to complete from start to finish.)
8. Now you can boot using that USB image on BIOS/UEFI for Win10/WinXP!
Note: In my case, I press "ESC" during POST to get to the boot menu.
Win10PE: <https://i.postimg.cc/HsGPFQSZ/hiren02.jpg>
WinXPMini: <https://i.postimg.cc/50BSJCK9/hiren07.jpg>
Note: My boot to Windows10PE was _much_ faster than to WinXPmini.
Win10PE looks just like "regular" Windows 10, kind of sort of: <https://i.postimg.cc/HsGPFQSZ/hiren02.jpg>
Win10PE had access to the old system also so I could save a screenshot: <https://i.postimg.cc/sDp0zvqV/hiren03.jpg>
9. Each boot environment has similar (but sometimes different) debug tools: <https://i.postimg.cc/qv5N2sWS/hiren15.jpg>
For example, on the Win10PE, these were the top level tools provided: <https://i.postimg.cc/W18WDxsC/hiren04.jpg>
o Accessories
o BCD-MBR Tools
o Computer Management
o Driver Management
o Hard Disk Tools
o Network
o Other Tools
o Removable Drive Tools
o Security
o System Tools
o Windows Recovery
Here's what the Hiren PE had in the "Hard Disk Tools" directory: <https://i.postimg.cc/5ttP8p00/hiren05.jpg>
o Data Recovery
o Defrag
o Diagnostic
o Disk Explorer
o Imaging
o Partition Tools
o Security
Here's what the PE had in the Hard Disk Tools "Diagnostic" category: <https://i.postimg.cc/CK6c7DB4/hiren06.jpg>
o GSmartControl
o HDDScan
o HDTune
o WD Data Lifeguard Diagnostics
For example, here are screenshots of those HDD diagnostics on Win10PE: <https://i.postimg.cc/CK6c7DB4/hiren06.jpg>
o GSmartControl <https://i.postimg.cc/BbTFgj2D/hiren13.jpg>
o HDTune <https://i.postimg.cc/WpGqxJJq/hiren14.jpg>
o WD Data Lifeguard Diagnostics <https://i.postimg.cc/KzKrnc9r/hiren12.jpg>
Here are HDD diagnostic utilities on WinXPmini (Hirens 15.2 Boot CD): <https://i.postimg.cc/7L7g1zk1/hiren09.jpg>
o Check Disk (chkdsk /f /x)
o CrystalDiskInfo (HDD/SSD SMART info)
o DiskView
o DiskWIpe (by Roadkill)
o HDD Capacity Restore
o HDD Low Level Format Tool
o HDD Scan (Low-level diagnostic)
o HDD Scan (Old version)
o HDD Tune (Test / Health / ErrorScan)
o Victoria (HDD Info / Test)
o Western Digital Data Lifeguard Diagnostic
o HDDScan
o HDTune
o WD Data Lifeguard Diagnostics
Note: While MemTest86 is on the Hirams Boot CD, you can boot it separately:
o UEFI MemTest86 v8
<https://www.memtest86.com/downloads/memtest86-usb.zip>
o BIOS MemTest86 v4 <https://www.memtest86.com/downloads/memtest86-4.3.7-usb.img.zip>
That MemTest86 utility came with an "ImageUSB.exe" utility from "Passmark.com" <http://www.passmark.com> which seems to do pretty
much whatever Rufus 3.11 did for the Hiren's Boot CD ISO
files to create a bootable USB stick.
See also:
o Windows 10 BSOD indicates a hardware problem - but what hardware is the problem?
<http://www.pcbanter.net/showthread.php?t=1110105> <https://alt.comp.os.windows-10.narkive.com/oL7PTNKu/windows-10-bsod-indicates-a-hardware-problem-but-what-hardware-is-the-problem>
-- https://perfectessaywriting.com/
As always, please test & improve so all may benefit from your every action.
On Friday, September 11, 2020 at 8:21:41 PM UTC-7, Arlen Holder wrote:if you are looking best Instagram services provider company then you can visit https://instantviral.uk
Tutorial creating & using Hirens Boot CD & MemTest86 diagnostic stress testing tools for USB boot to Windows 10 PE & WinXPmini on BIOS & UEFI
(As always, please improve so that all benefit from every action you take.)
Thanks to Mike Easter for suggesting Hiram BootCD USB diagnostic tools.
o What hardware diagnostic stress-testing freeware can you recommend? <https://groups.google.com/forum/#!topic/alt.comp.freeware/dkkdOmL95d8>
End result:
a. A 2GB USB stick can boot with BIOS/UEFI to Win10PE for diagnostics
b. A 2GB USB stick can boot with BIOS to WinXPMini for hardware diagnostics
1. Find an empty USB flash drive of at least 2GB size:
o Hirens BootCD Win10PE used about 1.25 GB of my 1.90 GB flash stick. <https://i.postimg.cc/HsGPFQSZ/hiren02.jpg>
o Hirens BootCD 15.2 used about 0.58 GB of my 1.90 GB flash stick. <https://i.postimg.cc/50BSJCK9/hiren07.jpg>
2. Determine whether your PC is BIOS or UEFI (mine is BIOS).
Win+R > %comspec% /k findstr Callback_BootEnvironmentDetect %SystemRoot%\Panther\setupact.log
o %SystemRoot%\Panther\setupact.log
- Callback_BootEnvironmentDetect: Detected boot environment: BIOS
- Callback_BootEnvironmentDetect: Detected boot environment: UEFI
Note: Mine reported BIOS
Win+R > msinfo32 > System Summary > BIOS Mode
- Win+R > msinfo32 > System Summary > BIOS Mode > Legacy
- Win+R > msinfo32 > System Summary > BIOS Mode > UEFI
Note: Legacy === BIOS
3. If needed, set your PC boot order so that it boots from the USB stick. For me the defaults worked: i.e., at POST, F10==BIOS, ESC=BOOT, F9=DIAG Entering Setup > Boot > Boot Device Priority
1st Boot Device = [CD-ROM Group]
2nd Boot Device = [Floppy Group]
3rd Boot Device = [HDD Group]
4th Boot Device = [Network Boot Group]
Note: USB isn't mentioned in my BIOS; but USB booted fine nonetheless.
4. Download the Hiren's Boot CD software containing diagnostic tools: <http://www.hirensbootcd.org/download/>
a. UEFI/BIOS Win10PE:
Download either the Win10PE BIOS/UEFI HirensBootCD (HBCD) ISO file: <https://www.hirensbootcd.org/files/HBCD_PE_x64.iso> <https://www.hirensbootcd.org/files/HBCD_PE_x64.iso> <http://mirror.sfo12.us.leaseweb.net/hirensbootcd/HBCD_PE_x64.iso>
Name: HBCD_PE_x64.iso
Size: 1354811392 bytes (1292 MiB)
SHA256: D67BCF0437A1BD27F31655C4A9C81C93269A5A239D43F38D0375618443D372BC
b. BIOS WinXPmini:
Or download the BIOS-only WinXPmini HirensBootCD (HBCD) ISO file: <http://www.hirensbootcd.org/files/Hirens.BootCD.15.2.zip>
Name: Hiren's.BootCD.15.2.iso
Size: 603979776 bytes (576 MiB)
SHA256: 50384A61D304E06B720F9EF729C662D2E9EDA05A96E1C9056975C40E3BF3F2D0
Note: The tools on these two releases are both the same & different: <https://i.postimg.cc/qv5N2sWS/hiren15.jpg>
5. Download the Windows Rufus ISO-to-USB tool:
<https://rufus.ie/> <https://github.com/pbatard/rufus/releases/download/v3.11/rufus-3.11.exe> Name: rufus-3.11.exe
Size: 1155640 bytes (1128 KiB)
SHA256: A43BF34285D393F843B05D80F74C4790ED7F6AC636393CA5F6375AE0BB02E719
Note: The hash on the portable Rufus was the same as the non portable.
6. Remove all USB drives & insert the empty USB flash drive into the PC.
7. In Windows, right click on the Rufus executable to run as administrator.
NOTE: The specific settings for creating a BIOS Win10PE USB are not documented anywhere on the net I could find, so please take note: <https://i.postimg.cc/2ykDXjW6/hiren01.jpg>
a. UEFI Win10PE
To create a bootable USB stick for HBCD_PE_x64.iso on UEFI machines:
When you start Rufus as an admin, accept the Win10 UAC consent prompt.
This brings up the Rufus 3.11.1678 GUI
Set the options to:
- Device: (choose your empty USB stick drive letter and label)
(If you only have one USB stick plugged in, it will default to it.)
- Boot selection:
(Choices are: "Disk or ISO image", "FreeDOS", "Non bootable")
I left the Boot selection at "Disk or ISO image".
I pressed the [SELECT] button to choose the "HBCD_PE_x64.iso" file.
- Partition scheme: GPT (The only options are "GPT" and "MBR")
Target System: The only option is "UEFI (non CSM)"
Volume label: This defaulted to "HBCD_PE_x64"
File system: FAT32 (other choices are "NTFS" & "FAT")
Cluster size: It defaulted to 4096 bytes (but other options existed).
When the Status says "READY", press the "START" button.
A warning pops up saying all data on the USB drive will be destroyed.
Press [OK].
The messages will be:
- Deleting partitions (This may take a while)...
- Partitioning (GPT)...
- Formatting (FAT32)...
- Creating file system: Task 1/5 completed.
- Creating file system: Task 2/5 completed.
- Creating file system: Task 3/5 completed.
- Creating file system: Task 4/5 completed.
- Creating file system: Task 5/5 completed.
- Writing Master Boot Record
- Copying ISO files:
- Success
(Mine took six minutes to complete from start to finish.)
Note: You'll get this error if you create a UEFI USB but boot on BIOS: <https://i.postimg.cc/2ykDXjW6/hiren01.jpg>
ERROR: BIOS/LEGACY BOOT OF UEFI-ONLY MEDIA
Recreate the drive in RUFUS and use:
* Partition scheme -> MBR
* Target system -> BIOS
b. BIOS Win10PE
To create a bootable USB stick for HBCD_PE_x64.iso on BIOS machines:
* Partition scheme -> MBR
* Target system -> BIOS (it was the only option once MBR was set)
* File system -> NTFS (it was the only option once MBR was set)
(Mine took five minutes to complete from start to finish.)
c. BIOS WinXPmini
To create a bootable USB stick for HBCD 15.2 on BIOS machines:
Boot selection -> Hiren's.BootCD.15.2.iso
Partition scheme -> "MBR" (it's the only option)
Target system -> "BIOS (or UEFI-CSM)" (it's the only option)
Volume label -> HBCD 15.2 (it's the default)
File system -> "FAT32" (other options are "FAT" & "NTFS")
Cluster size -> "4096 bytes (Default)"
[START] (Mine took 30 minutes to complete from start to finish.)
8. Now you can boot using that USB image on BIOS/UEFI for Win10/WinXP! Note: In my case, I press "ESC" during POST to get to the boot menu.
Win10PE: <https://i.postimg.cc/HsGPFQSZ/hiren02.jpg>
WinXPMini: <https://i.postimg.cc/50BSJCK9/hiren07.jpg>
Note: My boot to Windows10PE was _much_ faster than to WinXPmini.
Win10PE looks just like "regular" Windows 10, kind of sort of: <https://i.postimg.cc/HsGPFQSZ/hiren02.jpg>
Win10PE had access to the old system also so I could save a screenshot: <https://i.postimg.cc/sDp0zvqV/hiren03.jpg>
9. Each boot environment has similar (but sometimes different) debug tools: <https://i.postimg.cc/qv5N2sWS/hiren15.jpg>
For example, on the Win10PE, these were the top level tools provided: <https://i.postimg.cc/W18WDxsC/hiren04.jpg>
o Accessories
o BCD-MBR Tools
o Computer Management
o Driver Management
o Hard Disk Tools
o Network
o Other Tools
o Removable Drive Tools
o Security
o System Tools
o Windows Recovery
Here's what the Hiren PE had in the "Hard Disk Tools" directory: <https://i.postimg.cc/5ttP8p00/hiren05.jpg>
o Data Recovery
o Defrag
o Diagnostic
o Disk Explorer
o Imaging
o Partition Tools
o Security
Here's what the PE had in the Hard Disk Tools "Diagnostic" category: <https://i.postimg.cc/CK6c7DB4/hiren06.jpg>
o GSmartControl
o HDDScan
o HDTune
o WD Data Lifeguard Diagnostics
For example, here are screenshots of those HDD diagnostics on Win10PE: <https://i.postimg.cc/CK6c7DB4/hiren06.jpg>
o GSmartControl <https://i.postimg.cc/BbTFgj2D/hiren13.jpg>
o HDTune <https://i.postimg.cc/WpGqxJJq/hiren14.jpg>
o WD Data Lifeguard Diagnostics <https://i.postimg.cc/KzKrnc9r/hiren12.jpg>
Here are HDD diagnostic utilities on WinXPmini (Hirens 15.2 Boot CD): <https://i.postimg.cc/7L7g1zk1/hiren09.jpg>
o Check Disk (chkdsk /f /x)
o CrystalDiskInfo (HDD/SSD SMART info)
o DiskView
o DiskWIpe (by Roadkill)
o HDD Capacity Restore
o HDD Low Level Format Tool
o HDD Scan (Low-level diagnostic)
o HDD Scan (Old version)
o HDD Tune (Test / Health / ErrorScan)
o Victoria (HDD Info / Test)
o Western Digital Data Lifeguard Diagnostic
o HDDScan
o HDTune
o WD Data Lifeguard Diagnostics
Note: While MemTest86 is on the Hirams Boot CD, you can boot it separately: o UEFI MemTest86 v8
<https://www.memtest86.com/downloads/memtest86-usb.zip>
o BIOS MemTest86 v4 <https://www.memtest86.com/downloads/memtest86-4.3.7-usb.img.zip>
That MemTest86 utility came with an "ImageUSB.exe" utility from "Passmark.com" <http://www.passmark.com> which seems to do pretty
much whatever Rufus 3.11 did for the Hiren's Boot CD ISO
files to create a bootable USB stick.
See also:
o Windows 10 BSOD indicates a hardware problem - but what hardware is the problem?
<http://www.pcbanter.net/showthread.php?t=1110105> <https://alt.comp.os.windows-10.narkive.com/oL7PTNKu/windows-10-bsod-indicates-a-hardware-problem-but-what-hardware-is-the-problem>
--
As always, please test & improve so all may benefit from your every action.
- For more content and improvements you can also visit https://perfectessaywriting.com/
On Tuesday, 16 November 2021 at 10:58:55 UTC+5, kate balls wrote:
On Friday, September 11, 2020 at 8:21:41 PM UTC-7, Arlen Holder wrote:
Tutorial creating & using Hirens Boot CD & MemTest86 diagnostic stress testing tools for USB boot to Windows 10 PE & WinXPmini on BIOS & UEFI
(As always, please improve so that all benefit from every action you take.)
Thanks to Mike Easter for suggesting Hiram BootCD USB diagnostic tools.
o What hardware diagnostic stress-testing freeware can you recommend? <https://groups.google.com/forum/#!topic/alt.comp.freeware/dkkdOmL95d8>
End result:
a. A 2GB USB stick can boot with BIOS/UEFI to Win10PE for diagnostics
b. A 2GB USB stick can boot with BIOS to WinXPMini for hardware diagnostics
1. Find an empty USB flash drive of at least 2GB size:
o Hirens BootCD Win10PE used about 1.25 GB of my 1.90 GB flash stick. <https://i.postimg.cc/HsGPFQSZ/hiren02.jpg>
o Hirens BootCD 15.2 used about 0.58 GB of my 1.90 GB flash stick. <https://i.postimg.cc/50BSJCK9/hiren07.jpg>
2. Determine whether your PC is BIOS or UEFI (mine is BIOS).
Win+R > %comspec% /k findstr Callback_BootEnvironmentDetect %SystemRoot%\Panther\setupact.log
o %SystemRoot%\Panther\setupact.log
- Callback_BootEnvironmentDetect: Detected boot environment: BIOS
- Callback_BootEnvironmentDetect: Detected boot environment: UEFI
Note: Mine reported BIOS
Win+R > msinfo32 > System Summary > BIOS Mode
- Win+R > msinfo32 > System Summary > BIOS Mode > Legacy
- Win+R > msinfo32 > System Summary > BIOS Mode > UEFI
Note: Legacy === BIOS
3. If needed, set your PC boot order so that it boots from the USB stick. For me the defaults worked: i.e., at POST, F10==BIOS, ESC=BOOT, F9=DIAG Entering Setup > Boot > Boot Device Priority
1st Boot Device = [CD-ROM Group]
2nd Boot Device = [Floppy Group]
3rd Boot Device = [HDD Group]
4th Boot Device = [Network Boot Group]
Note: USB isn't mentioned in my BIOS; but USB booted fine nonetheless.
4. Download the Hiren's Boot CD software containing diagnostic tools: <http://www.hirensbootcd.org/download/>
a. UEFI/BIOS Win10PE:
Download either the Win10PE BIOS/UEFI HirensBootCD (HBCD) ISO file: <https://www.hirensbootcd.org/files/HBCD_PE_x64.iso> <https://www.hirensbootcd.org/files/HBCD_PE_x64.iso> <http://mirror.sfo12.us.leaseweb.net/hirensbootcd/HBCD_PE_x64.iso>
Name: HBCD_PE_x64.iso
Size: 1354811392 bytes (1292 MiB)
SHA256: D67BCF0437A1BD27F31655C4A9C81C93269A5A239D43F38D0375618443D372BC
b. BIOS WinXPmini:
Or download the BIOS-only WinXPmini HirensBootCD (HBCD) ISO file: <http://www.hirensbootcd.org/files/Hirens.BootCD.15.2.zip>
Name: Hiren's.BootCD.15.2.iso
Size: 603979776 bytes (576 MiB)
SHA256: 50384A61D304E06B720F9EF729C662D2E9EDA05A96E1C9056975C40E3BF3F2D0
Note: The tools on these two releases are both the same & different: <https://i.postimg.cc/qv5N2sWS/hiren15.jpg>
5. Download the Windows Rufus ISO-to-USB tool:
<https://rufus.ie/> <https://github.com/pbatard/rufus/releases/download/v3.11/rufus-3.11.exe> Name: rufus-3.11.exe
Size: 1155640 bytes (1128 KiB)
SHA256: A43BF34285D393F843B05D80F74C4790ED7F6AC636393CA5F6375AE0BB02E719
Note: The hash on the portable Rufus was the same as the non portable.
6. Remove all USB drives & insert the empty USB flash drive into the PC.
7. In Windows, right click on the Rufus executable to run as administrator.
NOTE: The specific settings for creating a BIOS Win10PE USB are not documented anywhere on the net I could find, so please take note: <https://i.postimg.cc/2ykDXjW6/hiren01.jpg>
a. UEFI Win10PE
To create a bootable USB stick for HBCD_PE_x64.iso on UEFI machines:
When you start Rufus as an admin, accept the Win10 UAC consent prompt. This brings up the Rufus 3.11.1678 GUI
Set the options to:
- Device: (choose your empty USB stick drive letter and label)
(If you only have one USB stick plugged in, it will default to it.)
- Boot selection:
(Choices are: "Disk or ISO image", "FreeDOS", "Non bootable")
I left the Boot selection at "Disk or ISO image".
I pressed the [SELECT] button to choose the "HBCD_PE_x64.iso" file.
- Partition scheme: GPT (The only options are "GPT" and "MBR")
Target System: The only option is "UEFI (non CSM)"
Volume label: This defaulted to "HBCD_PE_x64"
File system: FAT32 (other choices are "NTFS" & "FAT")
Cluster size: It defaulted to 4096 bytes (but other options existed). When the Status says "READY", press the "START" button.
A warning pops up saying all data on the USB drive will be destroyed. Press [OK].
The messages will be:
- Deleting partitions (This may take a while)...
- Partitioning (GPT)...
- Formatting (FAT32)...
- Creating file system: Task 1/5 completed.
- Creating file system: Task 2/5 completed.
- Creating file system: Task 3/5 completed.
- Creating file system: Task 4/5 completed.
- Creating file system: Task 5/5 completed.
- Writing Master Boot Record
- Copying ISO files:
- Success
(Mine took six minutes to complete from start to finish.)
Note: You'll get this error if you create a UEFI USB but boot on BIOS: <https://i.postimg.cc/2ykDXjW6/hiren01.jpg>
ERROR: BIOS/LEGACY BOOT OF UEFI-ONLY MEDIA
Recreate the drive in RUFUS and use:
* Partition scheme -> MBR
* Target system -> BIOS
b. BIOS Win10PE
To create a bootable USB stick for HBCD_PE_x64.iso on BIOS machines:
* Partition scheme -> MBR
* Target system -> BIOS (it was the only option once MBR was set)
* File system -> NTFS (it was the only option once MBR was set)
(Mine took five minutes to complete from start to finish.)
c. BIOS WinXPmini
To create a bootable USB stick for HBCD 15.2 on BIOS machines:
Boot selection -> Hiren's.BootCD.15.2.iso
Partition scheme -> "MBR" (it's the only option)
Target system -> "BIOS (or UEFI-CSM)" (it's the only option)
Volume label -> HBCD 15.2 (it's the default)
File system -> "FAT32" (other options are "FAT" & "NTFS")
Cluster size -> "4096 bytes (Default)"
[START] (Mine took 30 minutes to complete from start to finish.)
8. Now you can boot using that USB image on BIOS/UEFI for Win10/WinXP! Note: In my case, I press "ESC" during POST to get to the boot menu.
Win10PE: <https://i.postimg.cc/HsGPFQSZ/hiren02.jpg>
WinXPMini: <https://i.postimg.cc/50BSJCK9/hiren07.jpg>
Note: My boot to Windows10PE was _much_ faster than to WinXPmini.
Win10PE looks just like "regular" Windows 10, kind of sort of: <https://i.postimg.cc/HsGPFQSZ/hiren02.jpg>
Win10PE had access to the old system also so I could save a screenshot: <https://i.postimg.cc/sDp0zvqV/hiren03.jpg>
9. Each boot environment has similar (but sometimes different) debug tools:
<https://i.postimg.cc/qv5N2sWS/hiren15.jpg>
For example, on the Win10PE, these were the top level tools provided: <https://i.postimg.cc/W18WDxsC/hiren04.jpg>
o Accessories
o BCD-MBR Tools
o Computer Management
o Driver Management
o Hard Disk Tools
o Network
o Other Tools
o Removable Drive Tools
o Security
o System Tools
o Windows Recovery
Here's what the Hiren PE had in the "Hard Disk Tools" directory: <https://i.postimg.cc/5ttP8p00/hiren05.jpg>
o Data Recovery
o Defrag
o Diagnostic
o Disk Explorer
o Imaging
o Partition Tools
o Security
Here's what the PE had in the Hard Disk Tools "Diagnostic" category: <https://i.postimg.cc/CK6c7DB4/hiren06.jpg>
o GSmartControl
o HDDScan
o HDTune
o WD Data Lifeguard Diagnostics
For example, here are screenshots of those HDD diagnostics on Win10PE: <https://i.postimg.cc/CK6c7DB4/hiren06.jpg>
o GSmartControl <https://i.postimg.cc/BbTFgj2D/hiren13.jpg>
o HDTune <https://i.postimg.cc/WpGqxJJq/hiren14.jpg>
o WD Data Lifeguard Diagnostics <https://i.postimg.cc/KzKrnc9r/hiren12.jpg>
Here are HDD diagnostic utilities on WinXPmini (Hirens 15.2 Boot CD): <https://i.postimg.cc/7L7g1zk1/hiren09.jpg>
o Check Disk (chkdsk /f /x)
o CrystalDiskInfo (HDD/SSD SMART info)
o DiskView
o DiskWIpe (by Roadkill)
o HDD Capacity Restore
o HDD Low Level Format Tool
o HDD Scan (Low-level diagnostic)
o HDD Scan (Old version)
o HDD Tune (Test / Health / ErrorScan)
o Victoria (HDD Info / Test)
o Western Digital Data Lifeguard Diagnostic
o HDDScan
o HDTune
o WD Data Lifeguard Diagnostics
Note: While MemTest86 is on the Hirams Boot CD, you can boot it separately:
o UEFI MemTest86 v8 <https://www.memtest86.com/downloads/memtest86-usb.zip>
o BIOS MemTest86 v4 <https://www.memtest86.com/downloads/memtest86-4.3.7-usb.img.zip>
That MemTest86 utility came with an "ImageUSB.exe" utility from "Passmark.com" <http://www.passmark.com> which seems to do pretty
much whatever Rufus 3.11 did for the Hiren's Boot CD ISO
files to create a bootable USB stick.
if you are looking best Instagram services provider company then you can visit https://instantviral.ukSee also:
o Windows 10 BSOD indicates a hardware problem - but what hardware is the problem?
<http://www.pcbanter.net/showthread.php?t=1110105> <https://alt.comp.os.windows-10.narkive.com/oL7PTNKu/windows-10-bsod-indicates-a-hardware-problem-but-what-hardware-is-the-problem>
--
As always, please test & improve so all may benefit from your every action.
- For more content and improvements you can also visit https://perfectessaywriting.com/
if you can most important tech , gaming , health, trending information share this site to visit this site https://educircul.com/youtube-to-mp3-converters/
On Fri, 11 Sep 2020 20:09:19 -0400, n/a wrote:https://despreserialero.com/
Nice tutorial and now that you are loaded for bear and have all the tools - did any of them provide a clue as to what is causing the BSOD's?
Well, to be frank, I've shot my wad on these classic bear-hunting rifles...
o F9 Build-in HP Diagnostic check === good
o Memtest86v4 RAM Memory check === good
o WD Diagnostic HDD check === good
o Windows Driver Verifier Manager check === good
o USB Host Controller check === good
o MalwareBytes check === good
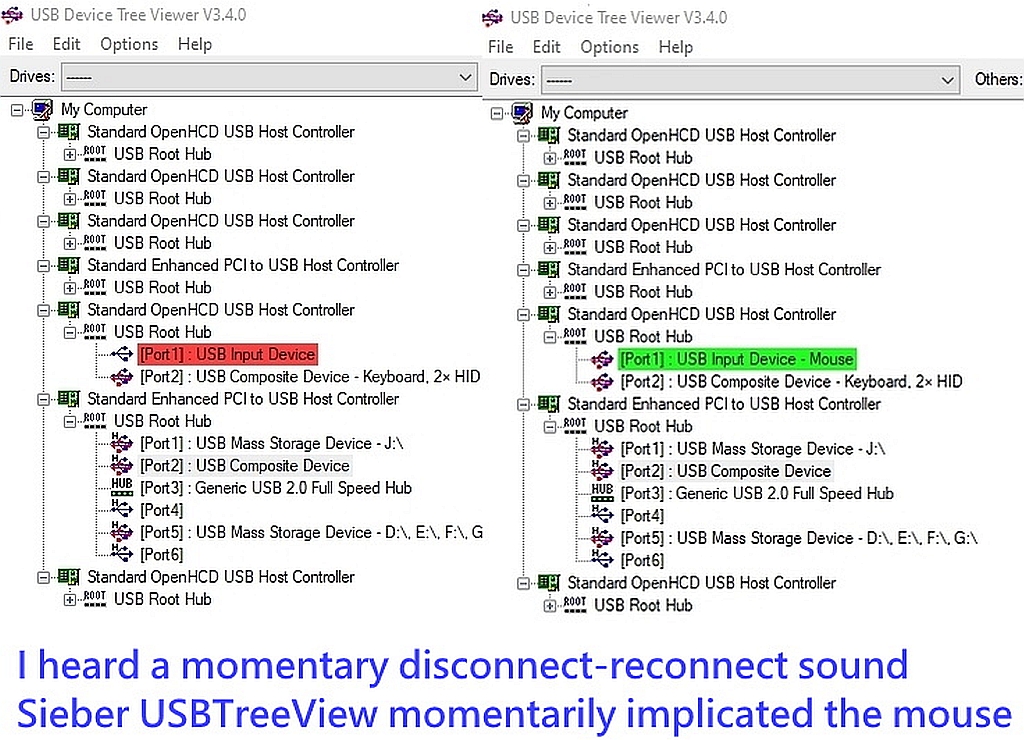
Given that the Sieber USBTreeView Paul suggested indicated a bad mouse:
o <https://i.postimg.cc/rmCXCgN2/usbview02.jpg>
I recently replaced the mouse but there still was one BSOD afterward.
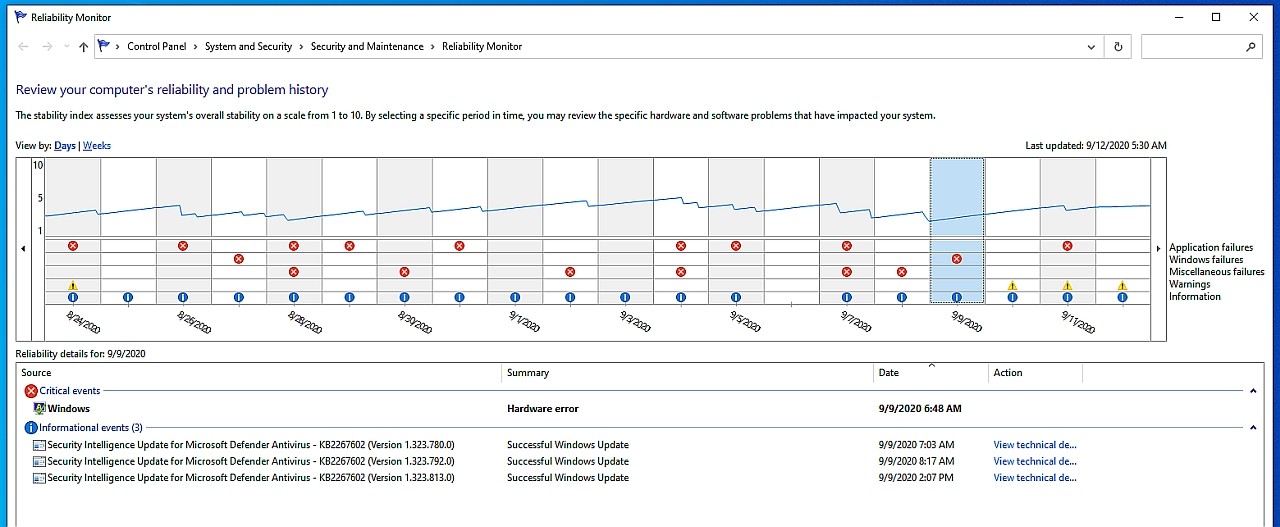
Yet, the BSODs kept coming & seem "maybe" related to "Windows Update" (although I'm not sure how to interpret this "Hardware Error" output)
o Win+R > perfmon /rel
<https://i.postimg.cc/HnnR8qdC/bsod106.jpg>
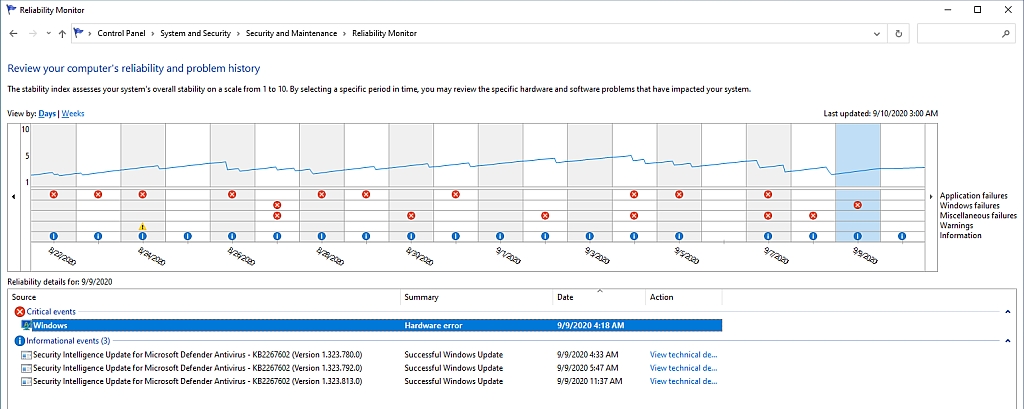
o [Control Panel\System & Security\Security & Maintenance\Reliability Monitor]
<https://i.postimg.cc/q7ZQbgXy/bsod-bios05.jpg>
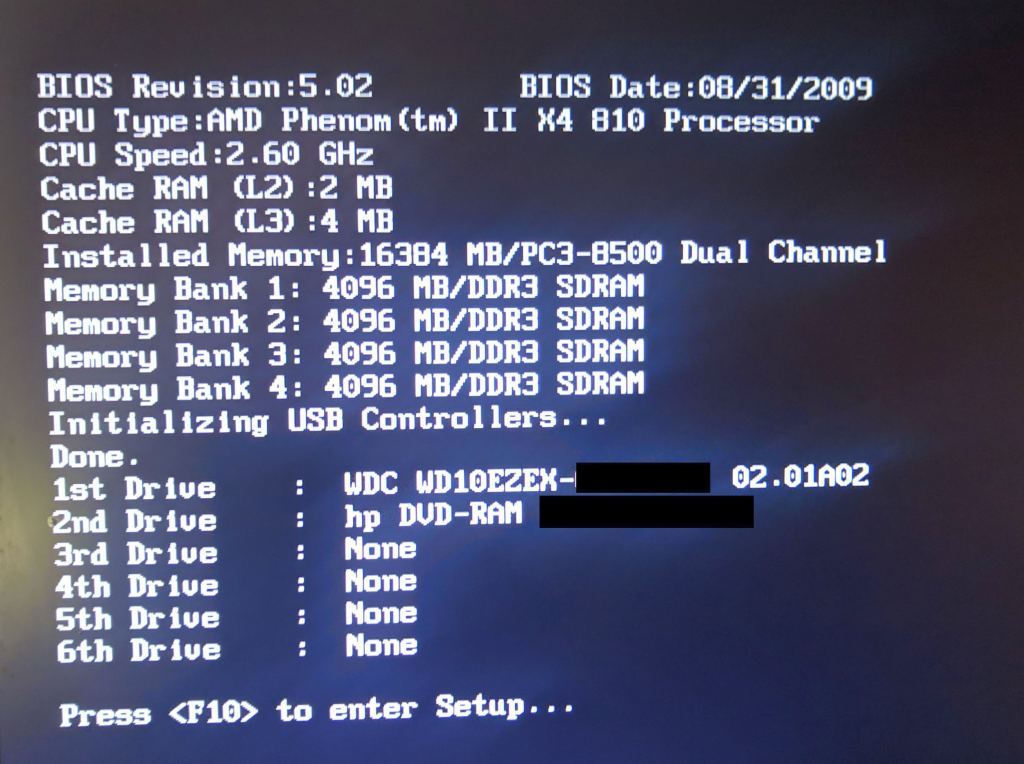
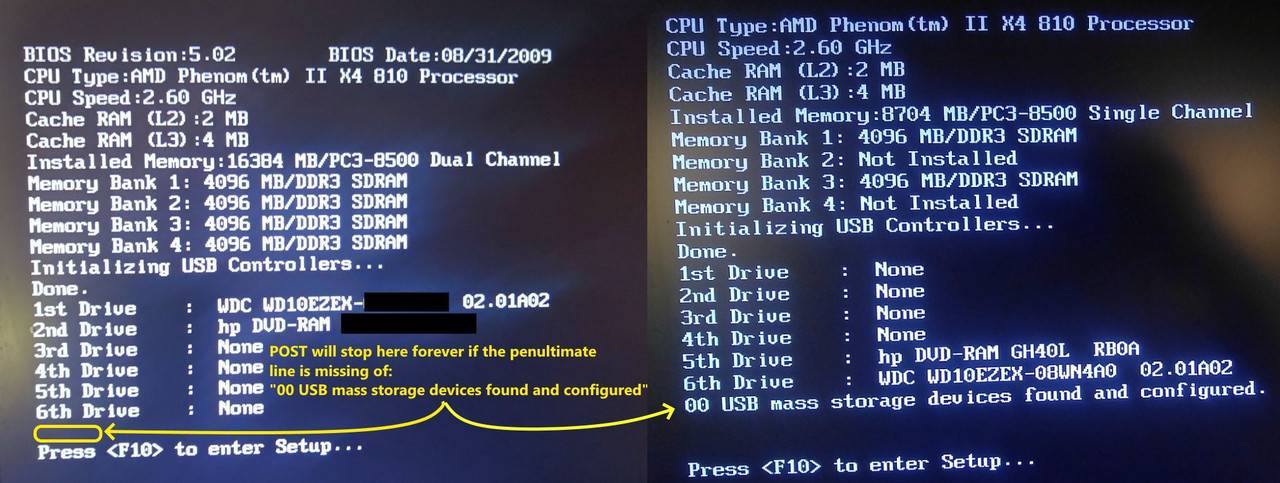
Sometimes, the POST never makes it to the checking-USB drives line
(which is a line missing from this screenshot just before the last line)
o <https://i.postimg.cc/zGpQ89NH/bsod11.jpg>
But most of the time it boots fine past that penultimate line:
o <https://i.postimg.cc/jdZ94dLY/bsod107.jpg>
The Memtest86v4 passes the 16GB of RAM no matter how long I run it:
o <https://i.postimg.cc/KY1Yk4WP/memtest02.jpg>
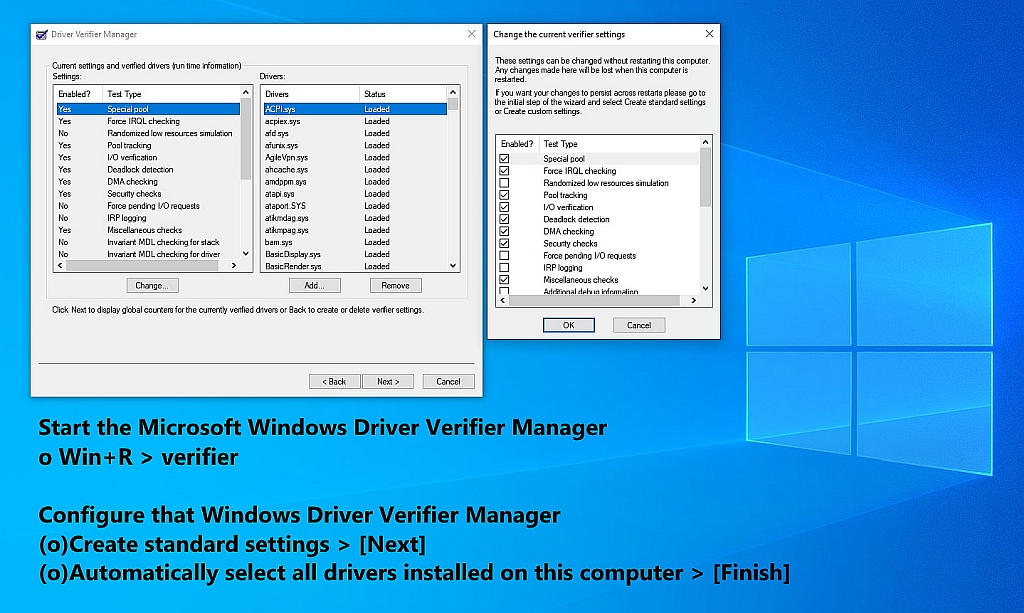
BTW, the Windows Driver Verifier Manager checks are enabled by:
o Win+R > verifier
<https://i.postimg.cc/vTnqk9GC/bsod100.jpg>
Configure that Windows Driver Verifier Manager
o Create standard settings > Next
o Automatically select all drivers installed on this computer > Finish
o Win+R > shutdown.exe /r /f /t 5 /c "Reboot in 5 seconds!"
I ran the driver verifier for an entire day while using the computer.
o The CPU took a huge hit; but every driver loaded tested out OK.
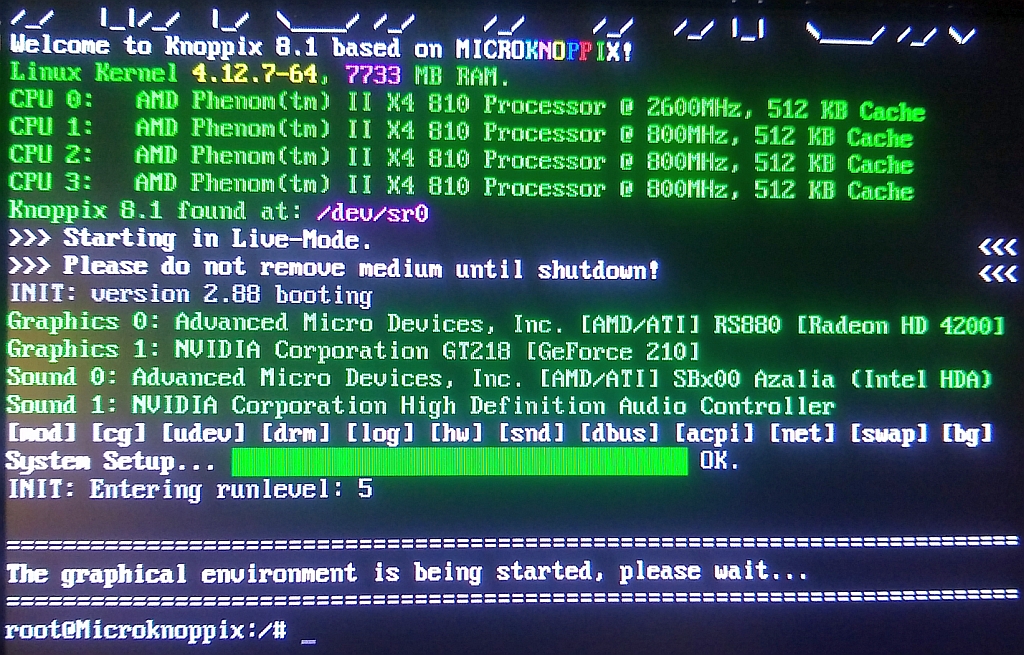
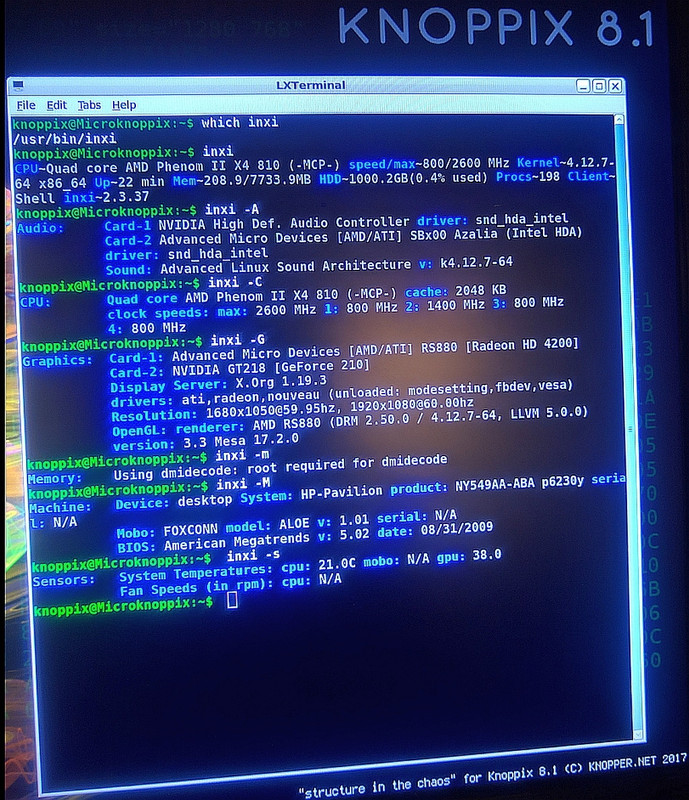
At Mike Easter's request, I booted to live Knoppix to describe hardware: <https://i.postimg.cc/BnMXSWXb/bsod105.jpg>
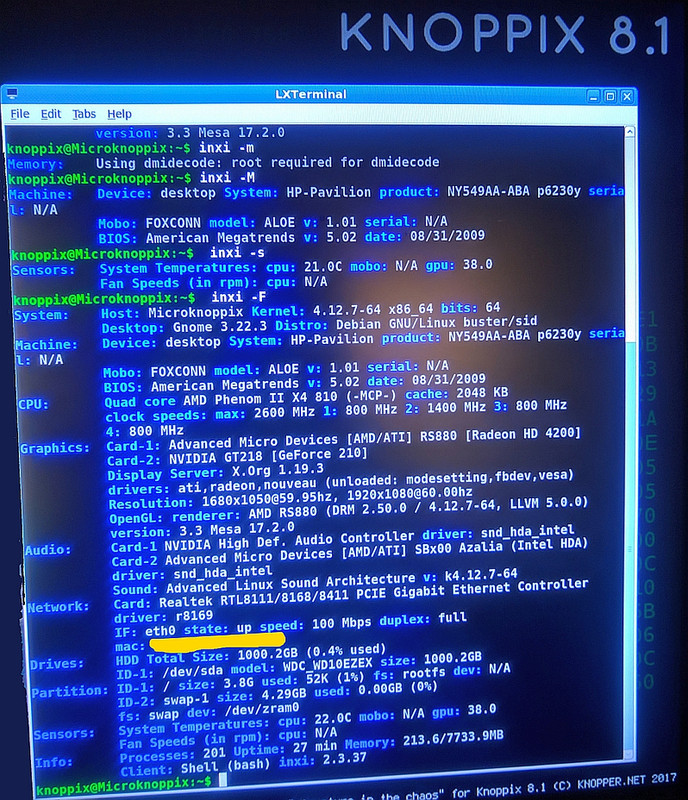
o inxi -Fx
For example inxi delineates mobo, graphics, audio, network, partitions: <https://i.postimg.cc/g0mndzYf/bsod103.jpg
I should note I disabled the Nvidia GeForce 210 card in the BIOS: <https://i.postimg.cc/MXJzD5Hh/bsod104.jpg
That "seems" to have helped, but a lot of things "seemed" to have
helped for a while, as just removing & replacing everything inside
that could be removed/replaced seems to have helped at times.
Luckily, I'm not out of .45-70 Government bear-hunting ammo just yet...
where I'm dutifully following this "BSOD Analysis" tutorial:
o Windows BSOD analysis - A thorough usage guide <https://www.dedoimedo.com/computers/windows-bsod.html>
Which eventually pointed me to these freeware minidump-parsing tools:
o WhoCrashed
<https://www.resplendence.com/downloads> <https://www.resplendence.com/download/whocrashedSetup.exe>
Name: whocrashedSetup.exe
Size: 9936128 bytes (9703 KiB)
SHA256: 0A7E3A03256D3143118BE5389F0C5F7F405A40066D999E246C57280E9282AE14
o WhySoSlow
<https://www.resplendence.com/downloads> <https://www.resplendence.com/download/WhySoSlowSetup.exe>
Name: WhySoSlowSetup.exe
Size: 3028336 bytes (2957 KiB)
SHA256: B86CED75CFB352A464613DE922FA8B9D63FA4494EAA24509713C01B0615097B3
o BlueScreenView
<http://www.nirsoft.net/utils/blue_screen_view.html> <http://www.nirsoft.net/utils/bluescreenview-x64.zip>
Name: BlueScreenView.exe
Size: 146528 bytes (143 KiB)
SHA256: 09F3023554BE864F31D80F2E7E7C7E824D79A69DDF84F1F02A433E85E866282C
o AppCrashView
<http://www.nirsoft.net/utils/app_crash_view.html> <http://www.nirsoft.net/utils/appcrashview.zip>
Name: AppCrashView.exe
Size: 51408 bytes (50 KiB)
SHA256: A192607D63FFD9448CCAAEAB461D3E3FABFAB999B0FC14CD869CC8C501312839
o WhatIsHang
<http://www.nirsoft.net/utils/what_is_hang.html> <http://www.nirsoft.net/utils/whatishang-x64.zip>
Name: WhatIsHang.exe
Size: 130144 bytes (127 KiB)
SHA256: E2095DBE5FF7A1E7113ABDF8D26BD8532789CE5B725FBF5321225E743B8E29B0
o WinCrashReport
<http://www.nirsoft.net/utils/application_crash_report.html> <http://www.nirsoft.net/utils/wincrashreport-x64.zip>
Name: WinCrashReport.exe
Size: 294096 bytes (287 KiB)
SHA256: 6638857A3BF187626B5E4878E10479AE5E4107DC786744F32D1E659955524B24
o Windows Debugger (Windbg) <https://docs.microsoft.com/en-us/windows-hardware/drivers/debugger/debugger-download-tools>
Getting Started with WinDbg (User-Mode) <https://docs.microsoft.com/en-us/windows-hardware/drivers/debugger/getting-started-with-windbg>
Getting Started with WinDbg (Kernel-Mode) <https://docs.microsoft.com/en-us/windows-hardware/drivers/debugger/getting-started-with-windbg--kernel-mode->
o Windows Symbol Packages (apparently no longer available offline): <https://docs.microsoft.com/en-us/windows-hardware/drivers/debugger/debugger-download-symbols>
o Official Microsoft Kernel Debugging Tutorial <https://docplayer.net/37532550-Kernel-debugging-with-windbg.html>
Name: Kernel_Debugging_Tutorial.doc
Size: 1196032 bytes (1168 KiB)
SHA256: 5A4E442B965280C791AC0AEA9D91B001AFF620F6ECF67C87AB011C1BAC673156
If those 430-grain hard-cast bear bullets don't work, there's always these:
o How to stress-test your PC hardware <https://www.pcworld.com/article/2028882/keep-it-stable-stupid-how-to-stress-test-your-pc-hardware.html>
o 18 Top Computer Stress Test Software To Test CPU, RAM And GPU <https://www.softwaretestinghelp.com/computer-stress-test-software/>
o Huge List of Computer Stress Test Software <https://www.trentonsystems.com/blog/list-of-computer-stress-test-software>
o Top 8 best tools to stress test and monitor your PC <https://pcgamehaven.com/best-tools-stress-test-monitor-pc/>
o How To Stress Test Your Hardware and Keep Your PC Stable <https://www.tested.com/tech/pcs/762-how-to-stress-test-your-hardware-and-keep-your-pc-stable/>
o Best Tools to Stress Test Your Computer <https://www.addictivetips.com/hardware/cpu-ram-stress-test/>
o Stress Test Your Hardware to Troubleshoot Problems <https://lifehacker.com/stress-test-your-hardware-to-troubleshoot-problems-and-5619416>
o The freeware stress test tool HeavyLoad <https://www.jam-software.com/heavyload>
o The 6 Best Free Programs for Stress Testing Your PC <http://blog.logicalincrements.com/2015/12/the-best-programs-for-stress-testing-your-pc/>
o CPU Stress Test Online
<https://cpux.net/cpu-stress-test-online>
o How to Stress-Test CPUs and PCs <https://www.tomshardware.com/reviews/stress-test-cpu-pc-guide,5461-13.html>
o 15 Best Tools to Stress Test Your PC <https://www.gearprimer.com/technology/best-tools-stress-test-pc-cpu-ram-gpu/>
o 16 Best Tools To Stress Test Your PC <https://www.rankred.com/best-tools-stress-test-pc-cpu-gpu-ram/>
o The 11 Best Tools to Stress Test Your PC <https://techguided.com/best-tools-to-stress-test-p-cpu-ram-gpu/>
o 8 Best Tools for Stress Testing your PC <https://premiumbuilds.com/guides/best-tools-for-stress-testing-pc-cpu-gpu-ram/>
o Best Tools To Stress Test Your PC: RAM & CPU Stress Tests <https://www.wepc.com/how-to/stress-test-cpu-ram/>
etc.
When hunting for bear, bring along plenty of high-grain ammo!
--
The great thing about identifying BSOD causes is there are so many of them.
Tutorial creating & using Hirens Boot CD & MemTest86 diagnostic stress testing tools for USB boot to Windows 10 PE & WinXPmini on BIOS & UEFIhttps://babyapk.com/
(As always, please improve so that all benefit from every action you take.)
Thanks to Mike Easter for suggesting Hiram BootCD USB diagnostic tools.
o What hardware diagnostic stress-testing freeware can you recommend? <https://groups.google.com/forum/#!topic/alt.comp.freeware/dkkdOmL95d8>
End result:
a. A 2GB USB stick can boot with BIOS/UEFI to Win10PE for diagnostics
b. A 2GB USB stick can boot with BIOS to WinXPMini for hardware diagnostics
1. Find an empty USB flash drive of at least 2GB size:
o Hirens BootCD Win10PE used about 1.25 GB of my 1.90 GB flash stick. <https://i.postimg.cc/HsGPFQSZ/hiren02.jpg>
o Hirens BootCD 15.2 used about 0.58 GB of my 1.90 GB flash stick. <https://i.postimg.cc/50BSJCK9/hiren07.jpg>
2. Determine whether your PC is BIOS or UEFI (mine is BIOS).
Win+R > %comspec% /k findstr Callback_BootEnvironmentDetect %SystemRoot%\Panther\setupact.log
o %SystemRoot%\Panther\setupact.log
- Callback_BootEnvironmentDetect: Detected boot environment: BIOS
- Callback_BootEnvironmentDetect: Detected boot environment: UEFI
Note: Mine reported BIOS
Win+R > msinfo32 > System Summary > BIOS Mode
- Win+R > msinfo32 > System Summary > BIOS Mode > Legacy
- Win+R > msinfo32 > System Summary > BIOS Mode > UEFI
Note: Legacy === BIOS
3. If needed, set your PC boot order so that it boots from the USB stick.
For me the defaults worked: i.e., at POST, F10==BIOS, ESC=BOOT, F9=DIAG Entering Setup > Boot > Boot Device Priority
1st Boot Device = [CD-ROM Group]
2nd Boot Device = [Floppy Group]
3rd Boot Device = [HDD Group]
4th Boot Device = [Network Boot Group]
Note: USB isn't mentioned in my BIOS; but USB booted fine nonetheless.
4. Download the Hiren's Boot CD software containing diagnostic tools: <http://www.hirensbootcd.org/download/>
a. UEFI/BIOS Win10PE:
Download either the Win10PE BIOS/UEFI HirensBootCD (HBCD) ISO file: <https://www.hirensbootcd.org/files/HBCD_PE_x64.iso> <https://www.hirensbootcd.org/files/HBCD_PE_x64.iso> <http://mirror.sfo12.us.leaseweb.net/hirensbootcd/HBCD_PE_x64.iso>
Name: HBCD_PE_x64.iso
Size: 1354811392 bytes (1292 MiB)
SHA256: D67BCF0437A1BD27F31655C4A9C81C93269A5A239D43F38D0375618443D372BC
b. BIOS WinXPmini:
Or download the BIOS-only WinXPmini HirensBootCD (HBCD) ISO file: <http://www.hirensbootcd.org/files/Hirens.BootCD.15.2.zip>
Name: Hiren's.BootCD.15.2.iso
Size: 603979776 bytes (576 MiB)
SHA256: 50384A61D304E06B720F9EF729C662D2E9EDA05A96E1C9056975C40E3BF3F2D0
Note: The tools on these two releases are both the same & different: <https://i.postimg.cc/qv5N2sWS/hiren15.jpg>
5. Download the Windows Rufus ISO-to-USB tool:
<https://rufus.ie/> <https://github.com/pbatard/rufus/releases/download/v3.11/rufus-3.11.exe> Name: rufus-3.11.exe
Size: 1155640 bytes (1128 KiB)
SHA256: A43BF34285D393F843B05D80F74C4790ED7F6AC636393CA5F6375AE0BB02E719
Note: The hash on the portable Rufus was the same as the non portable.
6. Remove all USB drives & insert the empty USB flash drive into the PC.
7. In Windows, right click on the Rufus executable to run as administrator.
NOTE: The specific settings for creating a BIOS Win10PE USB are not documented anywhere on the net I could find, so please take note: <https://i.postimg.cc/2ykDXjW6/hiren01.jpg>
a. UEFI Win10PE
To create a bootable USB stick for HBCD_PE_x64.iso on UEFI machines:
When you start Rufus as an admin, accept the Win10 UAC consent prompt.
This brings up the Rufus 3.11.1678 GUI
Set the options to:
- Device: (choose your empty USB stick drive letter and label)
(If you only have one USB stick plugged in, it will default to it.)
- Boot selection:
(Choices are: "Disk or ISO image", "FreeDOS", "Non bootable")
I left the Boot selection at "Disk or ISO image".
I pressed the [SELECT] button to choose the "HBCD_PE_x64.iso" file.
- Partition scheme: GPT (The only options are "GPT" and "MBR")
Target System: The only option is "UEFI (non CSM)"
Volume label: This defaulted to "HBCD_PE_x64"
File system: FAT32 (other choices are "NTFS" & "FAT")
Cluster size: It defaulted to 4096 bytes (but other options existed).
When the Status says "READY", press the "START" button.
A warning pops up saying all data on the USB drive will be destroyed.
Press [OK].
The messages will be:
- Deleting partitions (This may take a while)...
- Partitioning (GPT)...
- Formatting (FAT32)...
- Creating file system: Task 1/5 completed.
- Creating file system: Task 2/5 completed.
- Creating file system: Task 3/5 completed.
- Creating file system: Task 4/5 completed.
- Creating file system: Task 5/5 completed.
- Writing Master Boot Record
- Copying ISO files:
- Success
(Mine took six minutes to complete from start to finish.)
Note: You'll get this error if you create a UEFI USB but boot on BIOS: <https://i.postimg.cc/2ykDXjW6/hiren01.jpg>
ERROR: BIOS/LEGACY BOOT OF UEFI-ONLY MEDIA
Recreate the drive in RUFUS and use:
* Partition scheme -> MBR
* Target system -> BIOS
b. BIOS Win10PE
To create a bootable USB stick for HBCD_PE_x64.iso on BIOS machines:
* Partition scheme -> MBR
* Target system -> BIOS (it was the only option once MBR was set)
* File system -> NTFS (it was the only option once MBR was set)
(Mine took five minutes to complete from start to finish.)
c. BIOS WinXPmini
To create a bootable USB stick for HBCD 15.2 on BIOS machines:
Boot selection -> Hiren's.BootCD.15.2.iso
Partition scheme -> "MBR" (it's the only option)
Target system -> "BIOS (or UEFI-CSM)" (it's the only option)
Volume label -> HBCD 15.2 (it's the default)
File system -> "FAT32" (other options are "FAT" & "NTFS")
Cluster size -> "4096 bytes (Default)"
[START] (Mine took 30 minutes to complete from start to finish.)
8. Now you can boot using that USB image on BIOS/UEFI for Win10/WinXP!
Note: In my case, I press "ESC" during POST to get to the boot menu.
Win10PE: <https://i.postimg.cc/HsGPFQSZ/hiren02.jpg>
WinXPMini: <https://i.postimg.cc/50BSJCK9/hiren07.jpg>
Note: My boot to Windows10PE was _much_ faster than to WinXPmini.
Win10PE looks just like "regular" Windows 10, kind of sort of: <https://i.postimg.cc/HsGPFQSZ/hiren02.jpg>
Win10PE had access to the old system also so I could save a screenshot: <https://i.postimg.cc/sDp0zvqV/hiren03.jpg>
9. Each boot environment has similar (but sometimes different) debug tools: <https://i.postimg.cc/qv5N2sWS/hiren15.jpg>
For example, on the Win10PE, these were the top level tools provided: <https://i.postimg.cc/W18WDxsC/hiren04.jpg>
o Accessories
o BCD-MBR Tools
o Computer Management
o Driver Management
o Hard Disk Tools
o Network
o Other Tools
o Removable Drive Tools
o Security
o System Tools
o Windows Recovery
Here's what the Hiren PE had in the "Hard Disk Tools" directory: <https://i.postimg.cc/5ttP8p00/hiren05.jpg>
o Data Recovery
o Defrag
o Diagnostic
o Disk Explorer
o Imaging
o Partition Tools
o Security
Here's what the PE had in the Hard Disk Tools "Diagnostic" category: <https://i.postimg.cc/CK6c7DB4/hiren06.jpg>
o GSmartControl
o HDDScan
o HDTune
o WD Data Lifeguard Diagnostics
For example, here are screenshots of those HDD diagnostics on Win10PE: <https://i.postimg.cc/CK6c7DB4/hiren06.jpg>
o GSmartControl <https://i.postimg.cc/BbTFgj2D/hiren13.jpg>
o HDTune <https://i.postimg.cc/WpGqxJJq/hiren14.jpg>
o WD Data Lifeguard Diagnostics <https://i.postimg.cc/KzKrnc9r/hiren12.jpg>
Here are HDD diagnostic utilities on WinXPmini (Hirens 15.2 Boot CD): <https://i.postimg.cc/7L7g1zk1/hiren09.jpg>
o Check Disk (chkdsk /f /x)
o CrystalDiskInfo (HDD/SSD SMART info)
o DiskView
o DiskWIpe (by Roadkill)
o HDD Capacity Restore
o HDD Low Level Format Tool
o HDD Scan (Low-level diagnostic)
o HDD Scan (Old version)
o HDD Tune (Test / Health / ErrorScan)
o Victoria (HDD Info / Test)
o Western Digital Data Lifeguard Diagnostic
o HDDScan
o HDTune
o WD Data Lifeguard Diagnostics
Note: While MemTest86 is on the Hirams Boot CD, you can boot it separately:
o UEFI MemTest86 v8
<https://www.memtest86.com/downloads/memtest86-usb.zip>
o BIOS MemTest86 v4 <https://www.memtest86.com/downloads/memtest86-4.3.7-usb.img.zip>
That MemTest86 utility came with an "ImageUSB.exe" utility from "Passmark.com" <http://www.passmark.com> which seems to do pretty
much whatever Rufus 3.11 did for the Hiren's Boot CD ISO
files to create a bootable USB stick.
See also:
o Windows 10 BSOD indicates a hardware problem - but what hardware is the problem?
<http://www.pcbanter.net/showthread.php?t=1110105> <https://alt.comp.os.windows-10.narkive.com/oL7PTNKu/windows-10-bsod-indicates-a-hardware-problem-but-what-hardware-is-the-problem>
--
As always, please test & improve so all may benefit from your every action.
Hi everyone, Thanks for starting this discussion and I also would like to add own insight by sharing this https://gbinstaa.com site to you.The age of 33 was a crucial year in the life of Prophet Muhammad as it marked the beginning of his prophetic mission. The revelations he received during this time laid the foundation for the beliefs and practices of Islam. Despite facing opposition, the
| Sysop: | Keyop |
|---|---|
| Location: | Huddersfield, West Yorkshire, UK |
| Users: | 293 |
| Nodes: | 16 (2 / 14) |
| Uptime: | 218:43:43 |
| Calls: | 6,621 |
| Calls today: | 3 |
| Files: | 12,171 |
| Messages: | 5,317,787 |